

.png)
.png)
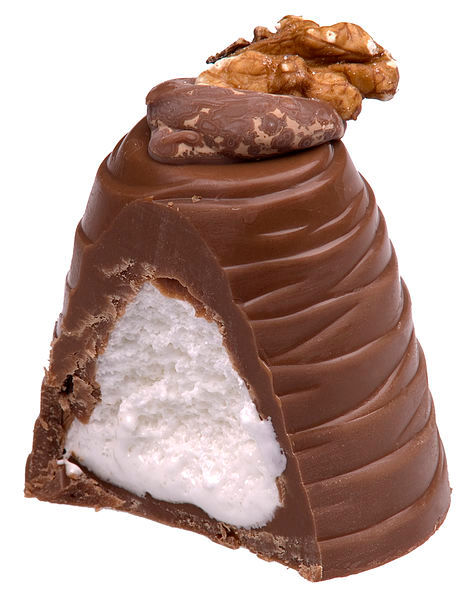
Buttery, vanilla & walnut cupcakes topped with fluffy mallow frosting, dipped in milk chocolate and topped with walnut - just like a Walnut Whip!

According to Nestle, a Walnut Whip is consumed every 2 seconds in the UK. Now, I don't know how accurate that statistic is, but if you've ever had the pleasure of devouring a walnut whip, you, like me, can probably completely appreciate that statement.
For those of you who have never had or even heard of a walnut whip until now, let me just tease your mental taste buds for a second.... Imagine - a thick, creamy milk chocolate hollow shell with a fluffy, light yet gooey vanilla filling, topped with a crunchy walnut for good measure. I'm drooling even writing this.
So, as you may have guessed, I'm a bit of a Walnut Whip fan. No surprises there. And as such, my inner-baker has been urging me to re-create these delectable confections in cupcake form for some time - of course!! After some encouragement from fellow bakers on one of my baking groups, I finally went through with my experiment!

The Cup Cake
The base of this cupcake is a sweet, soft and moist vanilla cupcake with chopped walnuts folded into the batter. We use a combination of oil and butter in the batter as well as a good helping of sour cream for optimum flavour, moistness and tenderness. If you can't get hold of sour cream, then plain greek yoghurt will also do the trick! The cupcakes have a lovely strong vanilla flavour, in keeping with the original flavours of a Walnut Whip. However, you can substitute some of the vanilla with a drop of almond extract if you would prefer to enhance the nutty flavours of the cake!
The Frosting
Now, the official description of a Walnut Whip details the filling as a "whipped vanilla fondant". Well, I've eaten enough in my time to be perfectly satisfied that the filling is more or less marshmallow fluff! Fluffy, sweet and dreamy marshmallow cream! So these cupcakes use a homemade marshmallow frosting, which is essentially a vanilla-flavoured cooked meringue (Meringue Cuite). This is easily whipped together (pun-intended) by whipping egg whites, sugar and cream of tartar over an in-direct heat, using the double-boiler method until very thick, glossy and marshmallowy! The frosting pipes beautifully and is stable enough that it should hold its shape for up to 2 days when refrigerated.
The Topping
After piping our mallowy meringue frosting, we dip our little whips into melted chocolate. I prefer to use milk chocolate to stay true to the flavours of a Walnut Whip, but you could also use dark chocolate which would offset the sweetness of the frosting.
To help with easy dipping, I add a drop of coconut or vegetable oil into the chocolate during the melting process, which helps keep the chocolate more fluid for longer.
Ensure the frosted cupcakes are chilled in the fridge for about 20-30 minutes before dipping, and that the chocolate has cooled slightly and is closer to room temp rather than piping hot! After dipping, top with a walnut piece and immediately put it in the fridge to cool and set. Once the chocolate has set, the cupcakes can be left out at room temperature for a couple of hours if serving straight away. Otherwise I recommend storing in the fridge for up to 2 days, but allowing them to thaw for about 10-20 minutes before eating.


Walnut Whip Cupcakes!
Hands on time: 25 mins
Baking: 18-22mins
Serves: 14 Cupcakes
Difficulty: Medium
Ingredients List
Cupcake:
155g All purpose flour
1 Tbsp Corn flour (cornstarch)
1 1/4 tsp baking powder
1/2 tsp salt
55g Unsalted butter, softened
45g Flavourless oil
200g Caster sugar
2 Medium eggs (Large in USA)
2 tsp Vanilla extract
120g Sour Cream (room temperature)
70g Roughly chopped walnuts
Mallow Frosting:
4 Egg whites
285g caster sugar OR 155g Icing sugar
1/2 tsp cream of tartar
1/2 tsp Vanilla extract
Topping:
400g Good quality melting chocolate
1 Tsp coconut or vegetable oil
Walnut halves/pieces to decorate
Method
1. Preheat the oven to 180C (160C fan) and line a cup cake tray with cupcake cases. This recipe makes 14 cakes so you will need 2 trays.
2. Make the batter: In a bowl, sift together cornstarch, baking powder and salt and then whisk briefly to ensure they are fully combined, set aside.
In a separate large bowl, add softened butter, about 1/4 of the oil, and the sugar and, using a handheld or stand mixer, beat on high speed for about 2 minutes until light and fluffy. Add the eggs one at a time, beating on a low speed and ensuring one is fully combined in the mixture before adding the next. Add the remaining oil, the vanilla extract and sour cream and beat until fully incorporated. On a very low speed, or by hand using a rubber spatula, gradually fold in the flour mixture until just incorporated, taking care not to over-mix. It is fine to have some streaks of flour at this stage, as we can ensure they are fully incorporated when folding in our walnuts. Once the walnuts have been gently folded into the batter, spoon the mixture into the cupcake liners, filling each just over 1/2 way full.
3. Bake: Bake the cupcakes for between 18-22 minutes, or until a skewer or toothpick, when inserted, comes out clean with only a couple of moist crumbs. I recommend testing your cupcakes at 18 minutes as they can dry out if over baked. Once baked, remove from the oven and, when it is safe enough to do so without burning yourself, remove the cupcakes from the pan and leave to cool to room temperature on a wire rack.
4. Make the frosting: Fill a medium-sized saucepan with a few inches of water and place on a medium heat on the hob, bringing to a low simmer.
In a small heatproof bowl, add the egg whites, sugar and cream of tartar and whisk together to combine. Rest the bowl over the simmering water, ensuring the bottom of the bowl does not touch the water, but is resting at least an inch above it.
Either by hand or using a handheld mixer, whisk the mixture on a low speed for about 5 minutes until very thick.
Remove the bowl from the saucepan and continue to beat using an electric mixer on medium-high speed for approximately 4-5 minutes or until the mixture is stiff, white, glossy and voluminous. Add the vanilla and beat to combine. The mixture should no longer be warm. (We are going to use the same pan of simmering water to melt the chocolate, so don't wash up yet, just top up with some more water!)
5. Pipe: Fill a piping bag attached with a round or star-shaped tip, or simply with the end of the bag snipped off. Starting from the outside edges of your cooled cupcakes and working inwards, pipe a tall swirl of frosting. Place the frosted cupcakes into the refrigerator for about 20-30minutes. If you have any extra frosting, you can always use this to bake meringues!
6. Topping: If using bars of chocolate rather than melting discs or chips, chop the chocolate up into small chunks to make it easier to melt. Put the chocolate and the oil in a small heatproof bowl and place over the pan of simmering water, ensuring the bottom of the bowl rests at least 1 inch from the surface of the water. Stir gently until the chocolate has completely melted then remove the bowl from the heat. If you are using a shallow bowl to melt your chocolate, I recommend transferring into a clean, taller bowl or container which will make dipping your cupcakes much easier. Leave chocolate to cool slightly, but not harden.
7. Dipping: Once your chocolate has cooled slightly, and your cupcakes have been chilled for at least 20 minutes, you can start dipping! Working with one cupcake at a time, holding the bottom, gently but quickly dip the cake into the melted chocolate until the frosting is completely covered, and lift the cupcake back out from the chocolate allowing any excess to drip off for a second or two. Set a walnut piece on the top of the cake and then place immediately into the fridge before starting on your next cupcake. Once all cupcakes have been dipped and topped, allow to rest in the fridge until the chocolate has completely set. Let the cupcakes thaw at room temperature for 10-20 minutes before serving, and enjoy!
Comments